And would you call it to his face?

Here’s a story I wrote for you.

Two poor brothers were wandering through the forest.

In a clearing, the two brothers came upon two children.

On each child’s neck, there was a rich and fine jewel-encrusted necklace, tightly locked onto her.

The mark of each necklace bore the name of an extremely powerful king that lived far away.

One brother took a child and said:

“I recognize this mark; it is my master’s mark. My master has promised a rich reward to all who are good to his children. Therefore, I will not kill this child and take the necklace, for my master would punish me with fire and torture. I will protect the child, and travel the far distance to my master, where he will reward me with untold riches instead.”

The other brother took a child and said:

“I do not recognize this mark. I have no master. I could kill the child and keep the necklace for myself, and no one would know. But I choose to save the child, because it is good and loving to do so. I will protect the child, and travel the far distance to his master. But I do not care whether I am rewarded. To make the right choice is its own reward.”

So here is your question:

Which of the brothers is the most good? 

As we move with zeal and desire

LLVM’s TableGen tool, as well the domain-specific language that goes with it, are exceptionally powerful. Tablegen is intended to take an extremely compact representation of almost everything a target machine does, and to spew out tons of helpful C++ support code, to make writing a compiler easier.

However, the documentation for TableGen is dreadful. It’s not written to the audience of developers who trying to port LLVM to a new target.

Here are some items that I wish that the documentation had explained going in.

  1. At its core, LLVM is fundamentally a set of base classes.  The base classes can be used to build language-related tools, such as a compiler, an assembler, a linker, and so on.  LLVM is not a single toy; it’s a bunch of Lego blocks that can be pulled apart and reassembled.  Being productive in LLVM development, is strongly related to understanding the existing LLVM class hierarchy.  This, in turn, implies that you must first understand what the LLVM class libraries take care of for you, so that you don’t reinvent the proverbial wheel.
  2. The standard LLVM distribution, for Windows anyway, doesn’t have all the built-in tools that you will need to work on LLVM.  You will need to bootstrap your own build of the LLVM compiler, with all the bells and whistles enabled, to do productive work.  This will probably be a via a two-stage bootstrap, where you use Visual C++ to generate a stage-one LLVM compiler, and then use the stage-one compiler to generate a complete, optimized stage-two LLVM compiler.  
  3. On Windows, make the new Visual Studio Code your primary development environment.  Use CMake and Ninja as your build system.  Although it is possible to generate a working build with classic Visual studios, do not do so, unless you absolutely must for some reason.  The projects generated by CMake for LLVM on Visual Studio, are bloated and slow.  You will eventually hate life as you wait for your Visual Studio solution to check every single project, in order to compile a single file.  
  4. The “Porting LLVM” guide suggests that you start with the SPARC target implementation, and copy it, in order to implement your own target support.  This might have been a good idea twelve years ago, but it’s a bad idea now.  A far more workable solution is to start from an implementation that already resembles your target in some way.  For example
  5. Although the TableGen language is a general-purpose templating language, a great deal of convention already exists regarding what kinds of things can be done with the language.  You must observe these conventions, as the base classes in LLVM 

Bootstrapping the LLVM compiler on Windows

Here’s the formula I used to bootstrap a complete release build of LLVM on Windows.

  1. Open a Visual Studio 2019 command prompt window
  2. git clone https://github.com/llvm/llvm-project
  3. cd llvm-project
  4. mkdir -p build/stage1
  5. cd build/stage1
  6. cmake ../../llvm -G "Visual Studio 16 2019" -A x64 -Thost=x64 -DLLVM_TARGETS_TO_BUILD="X86" -DLLVM_ENABLE_PROJECTS="clang;clang-tools-extra;libcxx;libcxxabi;lldb;compiler-rt;lld" -DCMAKE_BUILD_TYPE=Release -DLLVM_OPTIMIZED_TABLEGEN=1 -DCLANG_ENABLE_BOOTSTRAP=On -DCMAKE_INSTALL_PREFIX=[ a complete path to a stage-one compiler output directory ]
  7. cd ..
  8. mkdir stage2
  9. cd stage2
  10. cmake ../../llvm -G Ninja -DLLVM_EXPERIMENTAL_TARGETS_TO_BUILD=AVR -DLLVM_TARGETS_TO_BUILD="AArch64;X86" -DLLVM_ENABLE_PROJECTS="clang;clang-tools-extra;libcxx;libcxxabi;lldb;compiler-rt;lld" -DCMAKE_BUILD_TYPE=Release -DLLVM_OPTIMIZED_TABLEGEN=1 -DCLANG_ENABLE_BOOTSTRAP=On -DCMAKE_BUILD_TYPE=Release -DCMAKE_INSTALL_PREFIX=c:/git/llvm-project/build/ninja-clang-release/install -DCMAKE_C_COMPILER=clang-cl -DCMAKE_CXX_COMPILER=clang-cl -DCMAKE_LINKER=C:\git\llvm-project\build\ninja-msvc-release\bin\lld-link.exe

But just remember brothers and sisters, you can still stand tall

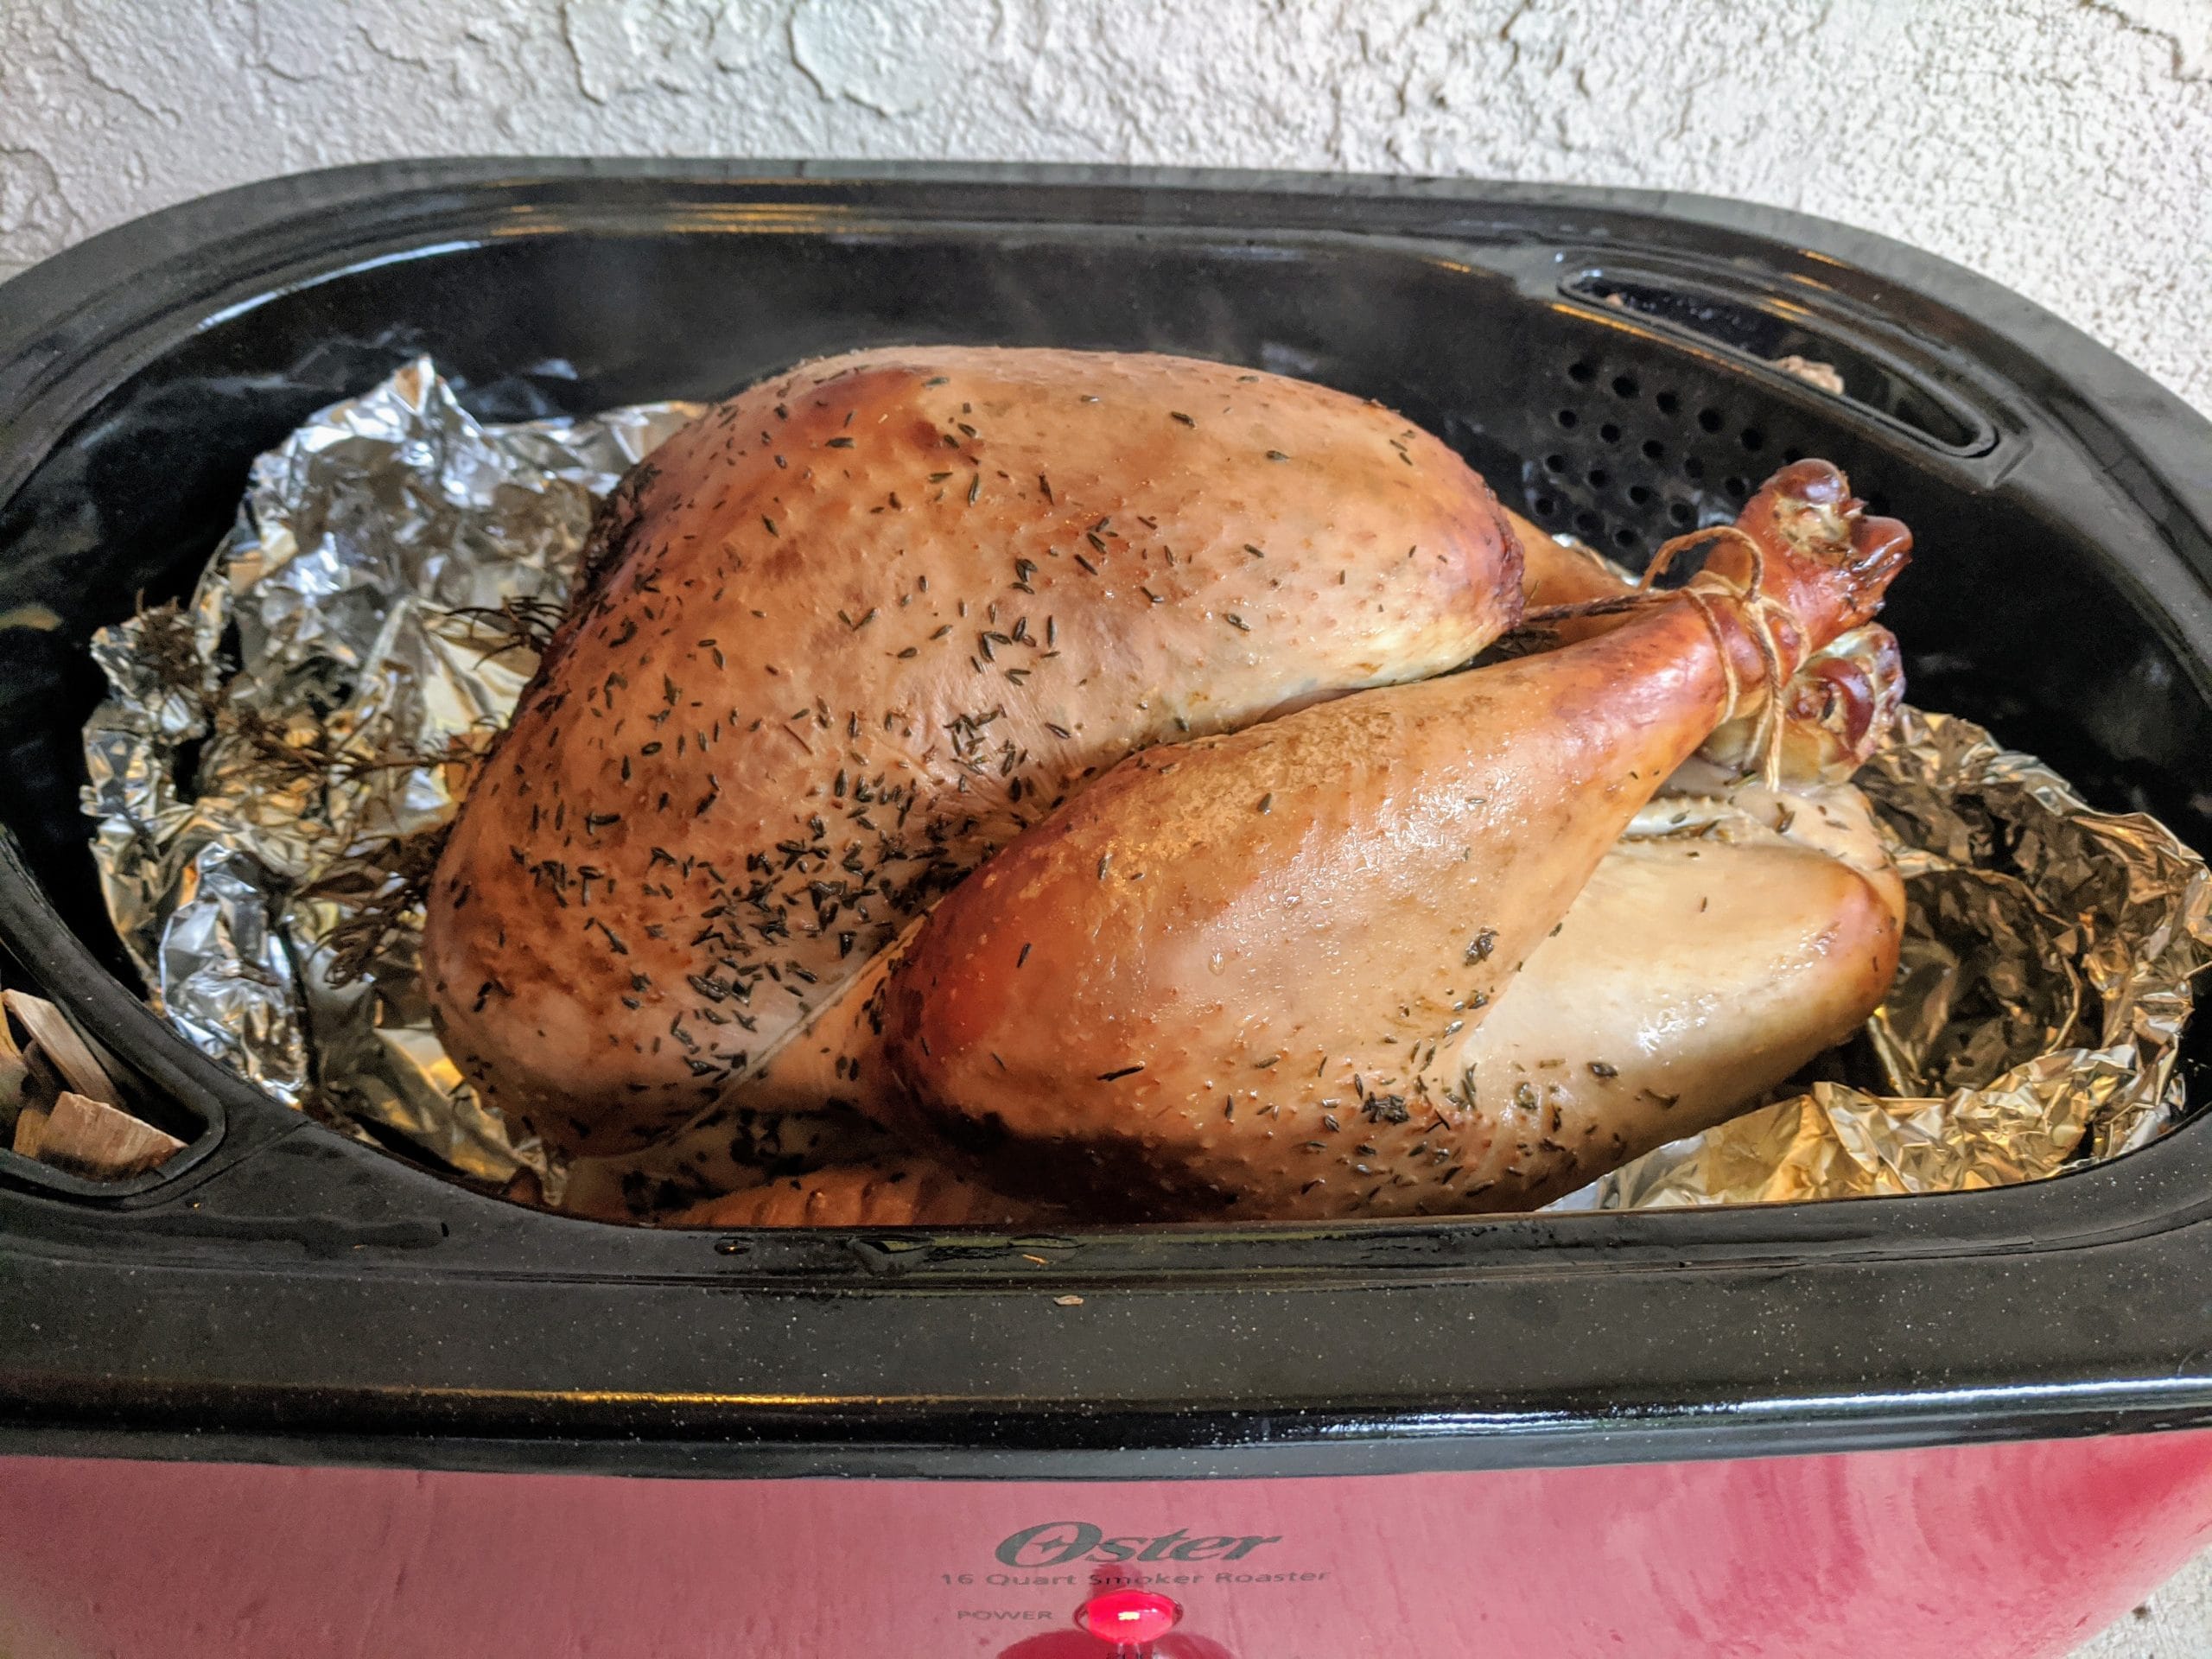
Pecan smoked roaster turkey made from this recipe

Pecan smoked roaster turkey made from this recipe

Here is the Best Thanksgiving Turkey that can be made with commonly available store-bought ingredients and tools.

This is a pecan-smoked turkey with rosemary and thyme aromatics, and it will be, by far, the moistest and most flavorful turkey you have ever tasted.

Brine your bird in overnight in salt, sugar and peppercorns; then, season and smoke your bird slowly at low temperature, with moist heat, in a smoker roaster. This will result in an incredibly moist, incredibly flavorful turkey, that is a HUGE leap in quality over classic oven methods.

A bird made using this method will keep well in the fridge. Sandwiches and other things made with leftovers, will be especially tasty.

Oster manufactures a smoker roaster; it’s about $60 on Amazon as of this writing. Most hardware stores stock pecan wood chips for smoking, but it’s available on Amazon as well.

Ingredient measurements are approximate. For this recipe, measure amounts with your heart, not your cups and spoons.

This recipe comprises lessons learned from hundreds of turkey recipes and dozens of turkeys cooked over thirty years. Thus, it can be objectively described as the Best Thanksgiving Turkey.

  • 1 1/4 c salt
  • 1 c brown sugar
  • 1/4 c peppercorns
  • 1 10-14 lb turkey, fresh or frozen
  • 1 onion
  • 4 sprigs fresh rosemary
  • 2 sprigs fresh thyme
  • 2 c white wine (whatever you have open in your fridge will do)
  • 6 T butter, softened
  • 1 1/2 c pecan wood chips, for smoking

  1. Choose an outdoor location for safely smoking with the smoker roaster. You will require electrical power for the smoker roaster. Do not smoke food indoors, and do not smoke where your roaster can be rained upon.
  2. Prepare brine by mixing 1 c salt, the brown sugar, and peppercorns in a clean, food-safe cooler, bucket, or other container of sufficient size to hold the turkey.
  3. Remove giblets, neck, and any plastic trussing from turkey. Reserve these for making gravy if you wish. Add turkey to cooler. Cover turkey with water. Brine bird by keeping cooler cold for a day; you may refrigerate it or top it up with ice.
  4. The day of your event, line your smoker roaster pan and its rack with wide aluminum foil, making sure not to cover smoke vents.
  5. Coarsely chop onion. Clean rosemary and thyme. Chop thyme leaves finely.
  6. Remove turkey from brine; drain. Place turkey on rack and place rack in smoker roaster. To stabilize turkey on rack, position wings upward, behind where turkey’s neck would be.
  7. With clean hand, gently separate turkey skin from breast with your fingers, starting from cavity. Try not to tear the skin and try not to move it much out of place.
  8. Generously rub 1/4 salt, butter, and thyme, underneath turkey skin onto turkey breast.
  9. Put sprigs of rosemary and coarsely chopped onion into breast cavity. These are aromatics only; do not eat these. If you want stuffing, prepare it separately. Do not cook stuffing inside your bird, as this cooking method does not achieve a safe temperature for this purpose.
  10. Add pecan wood chips to smoking cups. Make sure smoking vents in pan are not covered by foil.
  11. Add wine to smoker roaster pan. Place rack into smoker roaster pan, and then pan into smoker roaster, in your chosen outdoor location. Cover with lid.
  12. Set temperature to 200 F (two hundred degrees Fahrenheit).
  13. Roast bird for approximately four to five hours, more or less.
  14. Every half hour or so, baste the turkey with its drippings and wine, using a turkey baster.
  15. Temperature control during cooking is key. If your bird is cooking too fast for your party, you may need to pull the temperature back to 175 degrees F; if your bird is too slow, you may need to rush it along at 225 degrees F or higher. You may even hold its temperature below 150 degrees F. The slower you cook your bird, the juicier it will come out.
  16. Your bird is done when a digital thermometer, inserted in the deepest part of the breast against the breastbone, reads precisely 165 degrees F. Measure temperature precisely; do not estimate temperature through other methods. Your bird’s skin will be quite dark due to the smoking.
  17. Unplug roaster smoker. Move roaster smoker indoors. Let bird rest covered in pan for ten minutes or so.
  18. Insert a large serving fork in neck and a large serving fork into bird cavity. Lift bird slowly and carefully onto serving platter. Note that the bird may be lightly stuck to rack. Use caution while removing to avoid burns.
  19. If you choose to make gravy, do not use turkey pan drippings for it; smoked turkey drippings tend to be too bitter for this purpose.

Enses, enses requirimus, requirimus saevos nos

DEAR MISS MANNERS THE BARBARIAN: I’m a pharmacist. I have always been told that I look young for my age, which I have chosen to accept as a compliment. However, at the pharmacy, my customers frequently ask me my age, and some come right out and say that they would prefer to be served by an older pharmacist.  This is really starting to irritate me, as it’s directed at me multiple times a day and it’s none of their business how old I am. Is there any other polite way to get these people to stop asking?

GENTLE READER: When King Numedides lay dead at my feet and I tore the crown from his gory head and set it on my own, I had reached the ultimate border of my dreams. I had prepared myself to take the crown, not to hold it. In the old free days all I wanted was a sharp sword and a straight path to my enemies. Now no paths are straight and my sword is useless. What you can say, with a pleasant smile, is: “Perhaps you would prefer to come back tomorrow. I’ll still be the pharmacist, but I’ll be older then.”

DEAR MISS MANNERS THE BARBARIAN: My parents are first cousins. I have a friend who likes to tell jokes about people whose parents are first cousins. She is not aware that my parents are first cousins, and if she knew, she would be horribly embarrassed. Is there a way to politely put an end to these jokes?

GENTLE READER: Open, blast you! I’m a guest. I’ve paid Aram for a room, and a room I’ll have, by Crom! Bring me a tankard of Ghazan wine—I’ve got just enough left to pay for it. I notice nobody sleeps in the streets of Zamboula. The very beggars hunt a niche they can barricade before dark. The city must be full of a particularly bloodthirsty band of thieves. The easiest way of refuting prejudice is open to you. “But my parents ARE first cousins” is so good a stopper, that Miss Manners the Barbarian has heard it used by people who are not really the target of such remarks.

DEAR MISS MANNERS THE BARBARIAN: After a long flight from overseas, I realized that I had left my phone on my seat. As I could not return to the plane myself, I found a security guard, who found a representative from the airline to assist me. Before I could explain what happened, she snapped, “How could you be so irresponsible and not check for all your valuables before leaving the flight?” I was so taken aback by this customer service rep. How should I have responded to her?

GENTLE READER: Son of a slut! Mesmerism! Did you deem yourself strong, because you were able to twist the heads off civilized folk, poor weaklings with muscles like rotten string? Hell! Break the neck of a wild Cimmerian bull before you call yourself strong. I did that, before I was full-grown —like this! Hundreds of necks have been snapped between these fingers! Miss Manners the Barbarian would have said tersely, “Thank you for your courtesy” while checking the person’s nameplate.

Feeling incorrect? Do you wish to crush your enemies, see them driven before you, and to hear the lamentations of their women?  Address your questions (in black or blueblack ink on white writing paper) to Miss Manners the Barbarian, in care of this newspaper.

The time has come at last to throw away this mask

Here are some pretty mathematical identities that I found while trying to answer a programming question. Let’s say you want to find a sum of the following form:

0 \times 1 + 1 \times 2 + 2 \times 3 + 3 \times 4 + ... + (n-1) \times n

Or, in other words, you want to find:

\left \{ n, k, f(n)  \hspace{2mm} \epsilon \hspace{2mm} \mathbb{N}^0 \hspace{2mm} | \hspace{2mm} f(n) = \sum \limits_{k=0}^n k(k-1)\right \} \hspace{1cm} (1)

Now, the boring and slow way of doing this would be to write a computer program to iterate through all those possibilities and sum the results. But there’s a way we can calculate that result directly, without doing all those multiplies and adds.

First, let’s get some intuition as to what form a solution to this problem might take. Now an integral is not exactly the same as a finite sum, but the two are related.  For a monotonically increasing finite sum like the one above, the definite integral from 0 to n might resemble the formula we’re looking for:

\begin{aligned}  f(n) &\approx \int_{0}^{n} n(n-1) \\  &\approx \int_{0}^{n} n^2-n \\  &\approx \int_{0}^{n} n^2 - \int_{0}^{n}n \\  &\approx \frac{n^3}{3} - \frac{n^2}{2}  \end{aligned}

Now we’re not lucky enough to have this ballpark estimate be equal to the answer. However, this estimate gives us a hint that we might be able to find a solution in the form of a cubic polynomial of n:

f(n) = an^3 + bn^2 + cn + d \hspace{1cm} (2)

So let’s start by manually calculating the first few answers to equation 1:

\begin{aligned}  f(0) &= 0 \\  f(1) &= 0 \\  f(2) &= 2 \\  f(3) &= 8  \end{aligned}

Plugging these answers back into equation 1 we get:

\begin{array}{cccccccccccc}  a(0)^3 &+ &b(0)^2 &+ &c(0) &+ &d &= &0 \\  a(1)^3 &+ &b(1)^2 &+ &c(1) &+ &d &= &0 \\  a(2)^3 &+ &b(2)^2 &+ &c(2) &+ &d &= &2 \\  a(3)^3 &+ &b(3)^2 &+ &c(3) &+ &d &= &8 \\  \end{array}

Which we can immediately simplify to:

\begin{array}{cccccccccccc}  0a &+ &0b &+ &0c &+ &d &= &0 \\  a &+ &b &+ &c &+ &d &= &0 \\  8a &+ &4b &+ &2c &+ &d &= &2 \\  27a &+ &9b &+ &3c &+ &d &= &8 \\  \end{array}

Now before we begin solving this particular system of equations, just look at the first one, which has all of a, b, and c being multiplied by 0. So they can have no effect on the result of the equation, regardless of n. Therefore we know, without doing any real work, that:

d = 0

Plugging in zero for d, back into the system of equations, simplifies things a little more for us:

\begin{array}{ccccccccc}  a &+ &b &+ &c & & &= &0 \hspace{1cm} (3) \\  8a &+ &4b &+ &2c &- &2 &= &0 \hspace{1cm} (4) \\  27a &+ &9b &+ &3c &- &8 &= &0 \hspace{1cm} (5) \\  \end{array}

Okay, so we have reduced the problem to finding the three unknowns a, b, and c. Now there are a bunch of ways we can solve this system of simultaneous equations. Good old fashioned algebra works here, but we just have to be patient with carefully shuffling symbols around. From equations 3 and 4:

\begin{aligned}  a+b+c &= 0 \\  2(a+b+c) &= 0 \\  2a+2b+2c &= 0 \\  2a+2b+2c &= 8a+4b+2c-2 \\  -6a-2b &= -2 \\  \frac{-6a-2b}{-2} &= \frac{-2}{-2} \\  3a+b&=1 \hspace{2cm} (6)\\  \end{aligned}

And from equations 4 and 5:

\begin{aligned}  8a+4b+2c-2&=0 \\  \frac{3}{2}(8a+4b+2c-2) &= \frac{3}{2}(0) \\  12a+6b+3c-3&=0 \\  12a+6b+3c-3&=27a+9b+3c-8 \\  5&=15a+3b \\  15a+3b&=5 \hspace{1cm} (7) \\  \end{aligned}

Now — coming into the home stretch — from equations 6 and 7:

\begin{aligned}  3a+b &= 1 \\  3(3a+b) &= 3(1) \\  9a+3b-3&=0 \\  9a+3b-3&=15a+3b-5\\  2&=6a \\  a&=\frac{1}{3} \hspace{1cm} (8)  \end{aligned}

Finally! Now we have values for a and d. Now we can solve for b, from equation 6:

\begin{aligned}  3a+b &= 1 \\  3(\frac{1}{3})+b&=1 \\  b&=0  \end{aligned}

And from equation 3, we can get c:

\begin{aligned}  a+b+c &= 0 \\  \frac{1}{3}+0+c&=0\\  c&=-\frac{1}{3}\\  \end{aligned}

So we’ve figured out all the coefficients for the simultaneous equations:

\begin{aligned}  a&=\frac{1}{3} \\  b&=0 \\  c&=-\frac{1}{3} \\  d&=0\\  \end{aligned}

And we can insert those into equation 2 to find the characteristic equation, and hence we discover a couple pretty identities:

\begin{aligned}  f(n)&=\frac{1}{3}n^3 + 0n^2 -\frac{1}{3}n - 0 \\  &=\frac{1}{3}n^3 -\frac{1}{3}n \\  &=\frac{n}{3}(n^2-1) \\  f(n) = \sum \limits_{k=1}^n k(k-1) &= \bf{\frac{n(n^2-1)}{3}} \hspace{1cm} (9) \\  &= \bf{\frac{(n-1)(n)(n+1)}{3}} \hspace{1cm} (10) \\  \end{aligned}

Now that’s one way to do it. But this identity can be proven in multiple other ways.

You think your Commodore 64 is really neato

It is possible to run modern software on classic 6502-based computers such as the Commodore 64 and the Apple II.

Some ground work is in order.  The basic strategy involves beefing up the 6502-based machines as much as possible and dumbing down Linux as much as possible.

The secret sauce involves writing a new, 6502-based emulation of an ARM Versatile/PB development board.  The ARM Versatile/PB is still a first-class target for Linux.  I think that with the make tinyconfig command with cross-compilation, we can get the size of a Linux kernel sufficiently small to have it in expanded memory on the 6502 host.

We will need to write parts of an ARM926EJ-S emulator in 6502/65816 assembly. This sounds a lot harder than it actually will be, and large parts of it probably won’t even have to be written at all.  While the ARM seems to have a ton of instructions, at the bit level, each instruction breaks neatly into its command and operand components.  Most of the work will be in emulating ARM interrupts and user/supervisor modes in 6502 assembly, and for a first bringup it wouldn’t even be necessary to emulate the Versatile/PB interrupt controller. Each of the addressing modes will need to be handled, but no individual addressing mode will be that complicated.  The ARM instruction set has a lineage dating back to the original MOS chips, and many of the state flags for ARM are exactly the same as they were in the 6502 days.

Sixteen megabytes of memory will need to be added to the 6502 machines, with appropriate bank switching logic.  This has been done already for each of the 6502 hosts.  There is also a period-appropriate chip, the 74LS610, which was intended specifically for increasing the addressable memory on the 6502 series.

We use 65816 microprocessor (SuperCPU) instructions to access 16 MB of memory in a 6502 machine.  Or, we develop a virtual memory abstraction that can arbitrarily bank in and out pages of the 16 MB into the lower 64KB of memory on each host. The cc65 development environment already supports RAM expansion drivers for the Apple II and the Commodore 64.

To get Linux to be sufficiently small, we use make tinyconfig with a modern Linux cross-compiled kernel to get it under 8 MB.  We target the version 1 ARM thumb instruction set in the Linux cross compile, and that’s the instruction set we emulate on the 6502.

For testing the correctness of the emulator, we run QEMU emulating the VersatilePB, in parallel with the 6502 emulator emulating Thumb1. We write a script that single-steps both virtual machines and verifies that emulator states run in lockstep.

The performance will be abysmally slow, but who cares.  Most likely the 6502 machines will, at first, themselves be running in emulation on a much faster PC.

See Woz’s SWEET16 emulator for further inspiration and basic proof of concept for the Thumb portion of ARM emulation.


By pressing down a special key, it plays a little melody

Here are some of the fun exciting behaviors in store if you try to configure CentOS 7 or RedHat 7 as a combined DNS and DHCP server with dynamic DNS updates for a local network.  These notes are for an ipv4 network only; ipv6 is left as an exercise for the reader.

CentOS goes to some effort to silently but sincerely prevent you from doing this in the name of “security”.

You’ll want to do a fresh install and update of CentOS 7 and select Domain name server as the installation option.

Install some packages:

yum install bind-chroot bind dhcp

The key files you’ll be editing are /etc/rndc.conf, /etc/named.conf, /etc/rndc.keys, and /etc/dhcp/dhcpd.conf .

Follow Steven Carr’s advice on setting up more sane named logging. 

The zone files, normally stored in /var/named, are not given sufficient permissions to be read and written by the named process.  Move them to /var/named/dynamic.  Permissions, generally, are a bitch with this whole setup — expect that other files in /var/named may need to be chown’d to root.named and chmod’ed to 660 or 664.

SELinux silently prevents a lot of things that named and dhcpd want to do to maintain those zone files.  Convince it that this is OK by adding the following to /etc/sysconfig/named:

ENABLE_ZONE_WRITE=yes 

Also run this command as well:

setsebool named_write_master_zones on

You will find that named and dhcpd don’t start automatically at boot time when installed.  You’ll have to teach CentOS 7 to do this yourself.  Use systemctl enable to do this.

You can generate a secret key by running rndc-confgen.  The output will give you a hint as to what to put into rndc.conf as well as named.conf.

The secret key, usually stored in rndc.key, wants to be stored in several places, at least in /etc/rndc.key and /etc/rndc.conf and /etc/named.conf and /etc/dhcp/dhcpd.conf.  There is no public/private key exchange in named if you are just running a local DNS server; it’s all just one pre-shared secret key, which is neat.

nsupdate is your friend.  If you can’t manually get named to update by using this command to get to control port 953, do an experiment to see if you can add and delete records via the rndc interface by running rndc and issuing commands something like this:

update add dumb.yourdomain 900 IN A 10.1.1.1
debug on
show 
send

If you can’t do this yourself, then dhcpd won’t be any luckier; don’t bother trying to make dhcpd happy until named is properly responding to requests to update the zone files.

CentOS firewalls off all the relevant ports against you.  You’ll have to open these yourself.  

For setting up a dhcp server:

firewall-cmd --add-port=67/udp --zone=public --permanent
firewall-cmd --add-port=68/udp --zone=public --permanent

For setting up the dns sever:

firewall-cmd --add-port=53/tcp --zone=public --permanent